Guide to Google Search Console Permissions
For abeginner to the SEO world, the many tools and tricks of the trade can be daunting to learn and use accurately. Today, we’re talking about Google’s Search Console. What it is, how to use it, and what the benefits are to SEO professionals.

If you’re familiar with Google Webmaster Tools, you may already have a vague idea of what the Search Console is. Google provides this free tool that allows you to gather an incredible amount of information about your website.
Google search console lets your see how people find your site, the number of visitors, what’s devices are used to access your site, and so much more! We’ll get into the rest of the features that search console offers further into this article, but let’s take a look at how to use the tool!
How to Give Access to Search Console
To start using Google console, you first need to register your website with Google. Providing Google with the information about your website, verifying that you are the owner of the site, or at least that you are the person responsible for the domain.
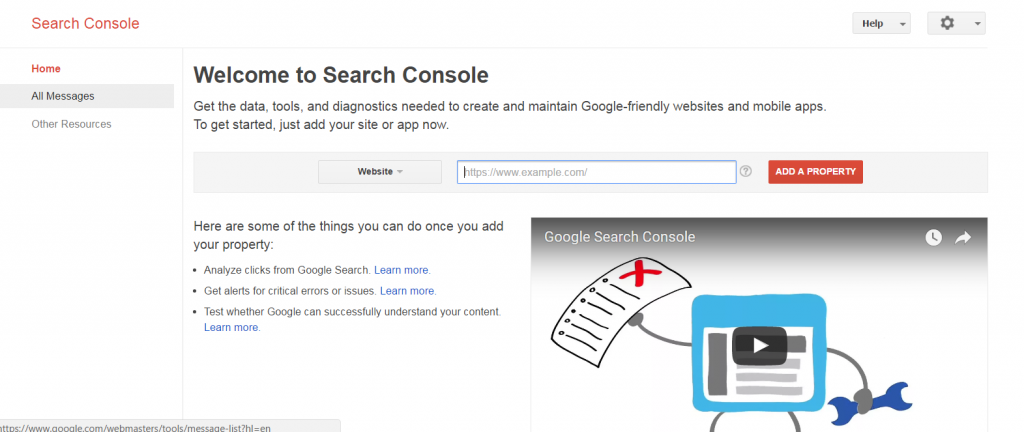
Adding your website to Google is incredibly easy, and opens the door for an incredible amount of SEO information. Start by entering your account in Google console. Once you hit the main screen, you’ll see a text box with a red button that reads “Add Property”. This is our starting point!
Simply enter your website in this text box, click the red button and boom – your website is now on your Google console! However, we’re not done. Now comes the time to prove that you are the owner of this website. Remember, with the information that Google provides regarding your website, they want to be certain that you are an authorized owner!
Google allows you to verify your site in a few different ways.
Managing Google Search Console Permissions
Now that you’ve added your site to Google, and it’s verified, let’s start looking at the search console permissions.
As in most Google webmaster tools, there are different options for different users.
Search console allows you to create users, owners, and delegate specific permissions for each account type.
Let’s start with owners.
- When working with search console permissions, an “owner” is considered someone that has complete control over everything in the search console.
- They’re what you’d think of as a “super user” of webmaster tools.
- Each website must have an owner. This means that your site will always have at least one owner as an account type.
- This person will view all data associated with your website, and have the ability to change, edit, and set up new owners and users.
- There are two different types of owners.
Verified owner – which means that Google has verified that you are the owner of the website through the use of other webmaster tools. If you use the same email address from blogger and search console, Google will deduce that your account’s are linked, and automatically verify you as the owner.
Delegated owner – this person is not a verified owner, and can only add other delegated owners to the search console.
- Owners are always notified when new owners are added to their search console. This gives the actual owner more clarity into who is accessing (or attempting to access) their website data.
– You have the ability to report owners as unauthorized if you do not recognize a new owner.
– You can view how the new owner verified that they were the owner of your website.
– Enter your “site settings” and click “manage property owners”.
– Select the owner you’d like to investigate.
– You may either delete or unverify the owner’s account if this is not a legitimate owner on your website.
Adding and removing owners
Since owners have full control over search console, they are the ones that can add, remove, and edit other owners and users (we’ll get to users in moments).
- To add an owner, access the homepage of your search console.
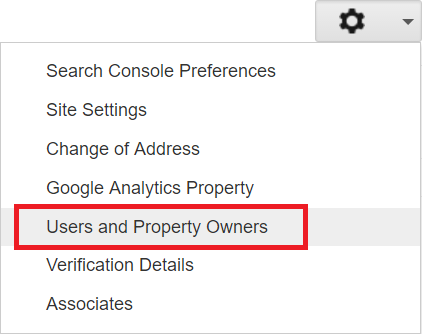
- As on most Google tools, there will be a gear in the upper right corner. Click on this gear and select “Users & Property Owners”
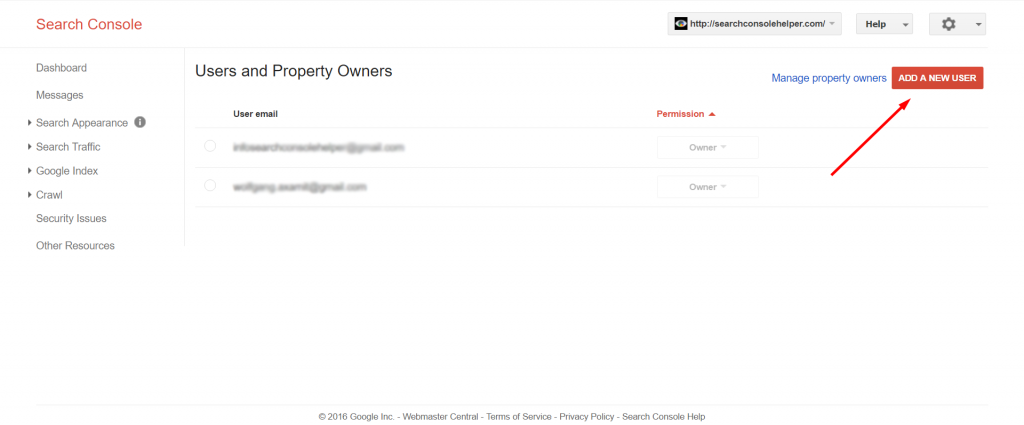
- Navigate to “Manage property owners link”.
- You’ll see a section titled “Verified owners”, and then a button that reads “Add an owner”. Click on this button, and follow the prompts to add the person’s email address. Click continue.
- Once the page refreshes, the property is now added to the email addresses’ search console automatically. Nothing left for you to do!
Deleting an owner is a little different. Like we talked about earlier, there are verified and delegated owners in a Google account. You cannot delete a verified owner without first removing the verified owners site verification (for example, you can remove the HTML tag verification token from the application).
Once the user is “unverified” follow the steps below.
- Choose a property that you want to edit.
- Click on the gear icon and click “Users & Property Owners”.
- As we did to add an owner, click on “Manage property owners”
- Click “unverify” next to the owner you want to remove from the property.
You’re all set!
Utilizing User Permissions
Users are a little different. Users can see everything as far as data is concerned with the search console. However, they cannot add any functionality or users to the account.
- Users must be added by owners.
- Full users are exactly as they sound – they have full access to everything on the search console, and can perform some basic actions on the account.
- Restricted users have very limited sight into data.
Adding and removing users follows the very same path as adding and removing owners.
- Find your gear icon from the homepage of your search console.
- Click on “Users & Property Owners”.
- Click “Add” or “Delete”, depending on the action you’d like to take.
And you’re done!
Permissions
There are many different permissions that Google allows for users and owners. To fully understand what each role is allowed access to, take a look at the table below. This is not a full list but will give you an idea of what each role allows.

As we talked about, designating someone as an “owner” of your property makes them a user with access to everything on your website. Only use this account type with people that need to act as an administrator, and need access to make changes to your site.
If you have a large team working on several different sites, grant them access as “users” to allow them to pull information for SEO purposes, but not give them permissions to make major changes. This alleviates headaches down the road!
Linking your websites into sets
It’s important to remember that Google calls any websites that you have verified and on the search console “properties”. If you have more than one property listed in webmaster tools, primarily in search console, you can add these properties to a “set”, which allows you to view data on several sites in one place.
A few things to remember about grouping properties into sets:
- Only verified properties can become part of a set.
- No users can be added to a set. This particular feature is only available to single sites. However, your sets will have an “owner”.
- If at any time, you lose access to a website in a set, that property will not longer be accessible. This doesn’t mean that you will lose any data – it simply means that you are no longer a verified owner of the site, and cannot access or make changes.
- You may only view data in sets as aggregated. If you do not want to see data for all the properties in the set, you must navigate to the specific website you’re curious about to view this data.
How To Use Search Console Property Sets
As with all maintenance on Google apps, the interface for creating, deleting, or editing a Property is pretty simple.
To create a new property set, remember these three things:
- You MUST be a verified user (even restricted user is fine) for ALL of the properties in the set.
- Your properties in a given set may not exceed 200.
- Review other rules that we discussed above.
To create a brand new property set first head to your console home page.
- Click “create a set”.
- You will be able to change the name of your new set at this time. Remember, you don’t HAVE to name your property set, but it certainly makes things easier if you decide to add additional sets in the future.
- Add set members – remember that these members must come from the users that are already attached to verified properties.
- Click “Save” to proceed with the changes. Not clicking save, or clicking “Cancel” will cause you to lose all of your work.
Data for this new set will begin to populate within a few days, so don’t panic if nothing appears right away!
Editing a Set
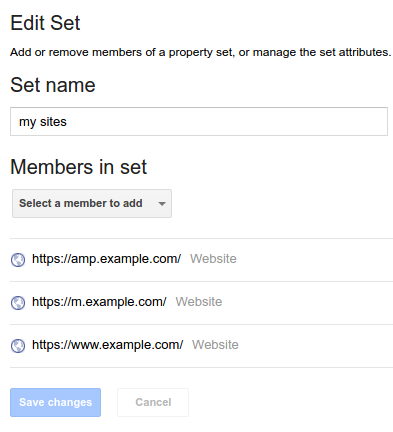
- Again, start at your console home page.
- Click “Manage Set” and then “Edit Set”. (You can also access through the gear when you’re already viewing a set)
When you edit or delete a member from the set, the historical data will still be visible to all users associated with that set, so no worries about losing any data!
Deleting a Set
Only delete a set when you TRULY do not need or want, any more of the data associated with this set. Once you remove the set, the data is gone, and cannot be re-accessed again.
- To delete a set, find the set that you’d like to delete on your search console.
- Click “manage set” and “delete”. The set is now gone for good!
While this may seem like a lot of information to process, if you are familiar with Google webmaster tools, you will find the dashboard and interface of Google search console familiar and easy to navigate.
We’d love to hear from you in the comments about your usage of search console. Do you find the data helpful in your SEO efforts? Are there tips and tricks you’d like to share?
Enter URL & See What We Can Do Submit the form to get a detailed report, based on the comprehensive seo analysis.